Showing posts with label tutorial Layers Photoshop digital collage vintage photographs. Show all posts

Friday, September 10, 2010

Veiled Memories


Veiled memories of you dwell uneasily upon my dreams


Oh how I miss having the time to do digital art! I'm currently busy with preparing for a Pirates of the Caribbean themed Bunco party and most of my time has been going into making decorations, running errands and setting up, making sure the ladies of my group are going to have a great time (yes, pictures will be posted after the party...don't want to give away any of the surprises just yet!).

I've also been drawn lately to mixed media, which is very much like doing digital art and photo manipulation but only in a traditional sense. I have traditional art to finish: The Sketchbook Project 2011, digital painting to complete: Remember the Pinup? Ongoing tasks to tackle (My Exploration project) and new challenges on the horizon (Write a Novel in November)...but, digital art still calls to me and I was inspired to create the above piece last night after perusing the new issue of Digital Studios Magazine. So much creativity flows out of the pages!  And, they printed a thank you letter I wrote! It's on page 2. :)  I truly love the magazine and wish it were printed more than twice a year. All the artists that are showcased are talented and inspiring. Looking through it makes me want to do more pieces to submit for the Spring issue but alas, time is a constraint for me right now and not sure I'll be able to pull it off. We shall see! As long as I'm doing some form of art, I'm a happy girl. :)
Have a wonderful and artful weekend!

Resources: The castle, butterfly and postcard are from my own stock collection and are available in my stock gallery at DeviantArt ; Texture by Shadowhouse Creations and Vintage Woman by MementoMori-Stock .

Monday, April 26, 2010

Digital Painting: Phoenix Rising


I finally finished my first 100% digital painting! "Phoenix Rising" as I call it was done following a tutorial by Kirk Nelson. The tutorial titled "Beginner's guide to digital painting" was to take about 5 hours and have 14 layers. I, however, took three times as long to complete my painting and had about ten more layers! I left steps out and added my own steps in which truly resulted in a final image unique to me. Although I have done digital painting before in small amounts on several of my digital creations, this was the first time the entire image was created by painting digitally with just my Wacom tablet, pen and Photoshop CS3.  From this tutorial, I learned how to use the Dynamic Brush engine to create the fire, which, was probably the hardest part of the image for me.  Here are the basic steps that I took to get to this final piece of art:
Sketching and Blocking in the color:

Starting with a grey background, the first step is just laying in different colors from the palette which ranged from black for the shadows, reddish brown and orange all the way to white for the highlights. I used just a regular brush in various sizes to block in the color and outline the Phoenix. I still applied my traditional art technique of painting light over dark...it works for both oil and digital!
Next I will begin to give the Phoenix more shape by using white for highlights and black for the shadows. I used the smudge tool to blend in the hard lines:
                                   

I created a custom feather brush and began to paint in the feathers.  This was just a little time consuming!
                      
Next, I created a Gradient layer just above the background layer and set the colors to purple and black and dragged the gradient across the canvas:

I created a custom brush in the brushes palette for the sparks as well as using a glitter photoshop brush by RedheadStock from DeviantArt and added them around the Phoenix:

Now it was time to paint the flames. I created a layer just beneath the sparks layer and using the Layer Styles control box, enabled the Outer Glow style and the Inner Glow style.  Using a bright orange I began to create general shapes of the flames surrounding the Phoenix and then switched to the Smudge tool to pull the flames out of the orange paint:

Repeating the same steps above, I change the Inner Glow color to red and the paint color to black and begin creating the dark red flames:

I added a fire "glow" to parts of the flames by selecting different sections, filling with red and then using Gaussian Blur filter to turn the hard-edged shape into a soft glow.  Adding the light trails was done by repeating the steps for the flames but just changing the color of the glow and the strength of the smudge tool:

Finally, I added a warming filter to really pump up the oranges and used the sharpening filter to bring out the details of the feathers and Viola! A mythical creature comes to life!

Now that I have learned the basics of digital painting from sketch, I think I would like to take the Mythical Beasts encyclopedia that I have and pick another creature of legend to paint on my own without a tutorial.  It will be interesting to see if I can remember everything I learned from creating the Phoenix. Perhaps at the next Digital Art Day at Lita's I will attempt to do a Pegasus! Stay tuned!

Wednesday, September 2, 2009

Creating a Vintage Collage with Photoshop

Cabinet cards...photographic postcards...vintage photographs. Over time, many of these images end up unwanted showing up in estate sales, antique stores and even on eBay. But, like our own photographs, these images once meant something to someone.

There are people like myself who collect old photographs. I find it interesting, these unknown faces staring at me. What kind of life did they live? What were their thoughts when that photograph was taken? What tragedies did they endure? What happiness graced them? Vintage collages can give new life to an old, discarded photograph and turn it into something creative and artful.

Even if you don't collect old photographs, you can find several resources online where you can download free images for use in your artwork. I currently have a few available for use here in my Vintage Stock Gallery: http://lausanne.deviantart.com/ Whether you are using my stock or someone else's, always remember to follow the rules for use.

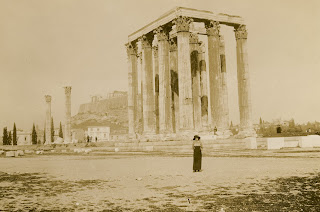
Now, let's see just how easy it is to create a vintage collage in Photoshop using layers! First, choose a vintage photograph. Here is the one I used from my own collection to create my image "Exploration":

It's a fantastic find for a vintage photograph having a lone figure in front of this stunning monument. But, let's make it more interesting! One of the easiest ways to do that is to add a texture. You can find textures available anywhere..just look around..peeling paint? brick wall? pile of hay? You can begin to stockpile your own textures or visit a group like Textures for Layers on flickr and download some free textures but be sure to follow the rules of the original contributor regarding use of their texture and be sure to always give proper credit:
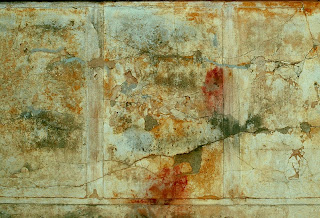
For "Exploration", I wanted a texture that had color since the original image is monotone. I chose one from flickr user bernhofen (who posted it in the Textures for Layers group) which is a photo of a corrupted Roman Fresco, perfect for this ancient monument:
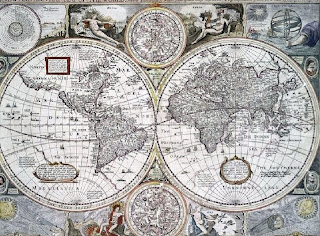
When making a collage, there is no limit to how many images you can layer into it. I've seen digital collages with dozens of images compiled into one masterful piece. However, for "Exploration", I didn't want to distract too much from the original photograph so besides the texture I decided on just one other additional item. I chose a map from my own personal stock in keeping with the theme of travel and exploration:
Now that you have all your images open in Photoshop, let's combine them using Layers.
The first step is to make a copy of your original background layer. You can do this by going to Layer-Duplicate Layer-Background Copy. This way your original image stays untouched in case you make a mistake or want to erase something you did.
Next, let's make a new layer above your Background Copy. Click on Layer-New Layer and name it "Texture". You can also create a new layer by clicking on the icon at the bottom of the layer pallet. Click on your texture image and go to Select-All followed by Edit-Copy.
You can now click on your new texture layer and select paste to add the texture. The texture will cover the entire image so you will need to adjust Opacity in order for your chosen photograph to show through. For "Exploration" I didn't want it too light because I wanted some of the color to show through so I chose to lower the opacity to 60%. You can now choose a blending mode...when doing collages or working with textures, I tend to use the following blending modes the most: Multiply, Soft Light and Overlay. For "Exploration" I chose Multiply which gives more punch to the colors in the texture.
With the Texture Layer highlighted in the layers pallet, click on the Layer Mask icon at the bottom. Using a soft brush you can erase any areas where you don't want the texture. In my image I erased around the top of the figure so she would stand out a bit more.
Continue to add images by repeating the same step above to create new layers, adjusting opacity & blending modes and softening up or removing any hard edges by using a layer mask with a soft brush. For the map image, I used the rotate tool to angle the image before blending it in with Overlay set at 50%. By placing the map up in the top left corner, I balance out the composition. Any additional images added to this piece would throw that off. You still want to be mindful of composition when creating collages. Be creative but don't overpower your composition by placing too many images into one piece.
I hope you enjoyed this short tutorial and above all, remember to be creative and have fun!