Saturday, November 29, 2008

Creative process of "Harbinger"

"Harbinger"
I had an idea of Lita being "a bringer of things", a Harbinger foretelling events. I did a quick sketch of my idea and began looking through my archives to see what setting I could use. I knew I wanted there to be a seaside cliff. I found the image "The North Sea" from my archives taken during my Coast to Coast Walk in England.
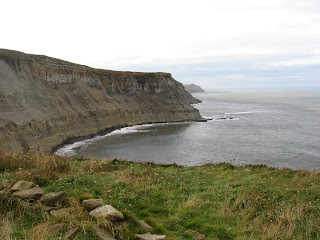
My first step was to turn it from day into a night image. I did this by using colorize in the hue/saturation adjustment. Tinting it blue, reducing the saturation and light. The blown out sky got replaced first with a layer of color, matching it to the image and then with a star field, created by using the Noise filter. To create the clouds, I used a Northern Lights photoshop tutorial paired with this black and white image of clouds, tinted and color matched to the previous layer.

The Eclipse and Lightening were created from scratch using photoshop tutorials. The rain was made using the Noise Filter and Motion Blur and then angled in the direction desired.

Next up was taking the relatively calm sea in the original photo and making it stormy. I used waves from several images in my archives, cutting, scaling, cloning, warping, smudging and matching colors until I was satisfied:

Now that I had stormy seas, I wanted to add a vortex. I used a stock image of a whirlpool and followed a tutorial. This was one of the most difficult parts of the image to work on. It took alot of cloning, warping, erasing, smudging, dodging, burning and perspective adjustment to get it to look just right. The ship was a stock image that was scaled down and skewed to look as though it was being sucked into the vortex. A final layer of Grit was added over the seas and sky to give it a bit more of a dark feel.

Now that the scene was completed I worked on transforming Lita. This was the starting image I chose to use, one which I plan on using again in the future (it has lots of possibilities!):

Using the Polygonal Lasso Tool, I cut Lita from the scene. Using Levels, I lightened her skin. Turning her eyes green was done with the Elliptical tool and hue/saturation. Eyeshadow and lashes were added using brushes. I browsed costume images on Google until I found a cloak and gown that I liked. These were then cut out and pasted into new layers to be worked on separately. Cloning and warping were the main tools used to dress Lita. The cloak was originally on a naked mannequin and that had to be removed. The gown was originally a dull grey color and it was changed using the Color Match tool. Photoshop brushes were used in two colors to give her hair volume, length and strands blowing in the wind.

In place of the skull, I wanted a crystal ball. This was done with a photoshop tutorial and by using outer & inner glow along with dodging.

Finally, a Harbinger is in essence an Omen...so two were added to the image...a black cat which was a stock photo and this image of a Boat Tailed Grackle, standing in for a Raven:
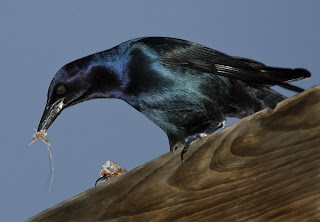
He was elongated using the skew & distort tool and place into the scene. After everything was in place I flattened the image and added the final touches of dodging highlights and burning shadows and viola! A piece of digital art!

Monday, November 24, 2008

Welcome to the Magic Show!

I had alot of fun creating this "mad magician" image. Lita and I donned the outfits and did the shoot the same day we did the mermaid "swimming" pics. I didn't have to do much digital work to Lita and I except for replacing my crazy top hat with a more traditional one which I then painted. The red bow tie came from a costume image off of google. I also used a diffused glow filter over Lita's body which gave her the look of enchantment. Both the curtains,background and bunny were stock images. For the background I had to take out things such as a window and some chains before changing the color. I changed color of the floor as well to make it fit in with my overall warm toned scheme. The bunny was originally coming out of my top hat and that was a little too much. I still wanted to use the cute little guy so off to the corner he went. Magic dust and sparkles were added using brushes and the effect of shadows being cast was done using the burn tool. After the image was together I added a CCTV dirty camera texture to a top layer and changed the blending mode to Overlay and the opacity to 50%. This popped the brightness up in the center of the image while leaving the dark edges of the texture. This image definately speaks to what I am learning right now with digital art...I'm discovering a world of magic and becoming a digital magician and oh boy, is it alot of fun!

Friday, November 21, 2008

Inspiration can come from anywhere

I find inspiration everywhere and this Nike commercial is a perfect example of that. It's just another sports commercial to most people but for me I find that the themes of life's passion, determination and hard work motivate me to "Leave Nothing" when following my dreams. I find football extremely passionate...there is always raw emotion, players trying to do and be their best. Doing what they love and doing it for the entertainment of millions of fans. As an artist on a journey of discovery, I have looked at the sport in a completely different light. One that is vibrant, fully energized and full of a cast of colors. Another reason this commercial touched me was the music...I was drawn to it and finally, after a month of watching it over and over figured out why. It's connected to my childhood and pleasant memories of us kids settling in to watch Clint Eastwood in "The Good, The Bad and The Ugly" with my dad who is a huge Eastwood fan (and quite coincidental, my birth father LOOKS just like Eastwood). The music is from that movie. When I finally figured it out, all those Eastwood movies, including my favorite "Two Mules for Sister Sara" came flooding back to me along with memories of us at the drive in theatre, with the large silver speaker hanging on the drivers side window blaring those familiar western themes. I began thinking about doing a photo series based on those movies and got extremely excited over bringing my childhood back to life. And to do it for my dad, who will probably get a kick out of it while recovering from shoulder surgery. Of course, I will need to find a poncho, cowboy hat, mule and a nun costume first. :)

Wednesday, November 19, 2008

Creative process of "The 12th Sign"

"The 12th Sign"
To create the digital art piece "Pisces" for my Zodiac Series I had envisioned the two fish swimming in opposite directions as mermaids. I started with several images that Lita and I had taken of ourselves in a "swimming" position, which gave our abs quite the workout! I had to only use one image from Lita's session but with me I used four different photos piecing together my body from one, face from another, and arms each from yet another photograph. When I finally had our bodies in place, I created the tails, fins and hair with brushes. Lita's hair was easy but changing my hair color completely and making it have depth was not an easy task! I imagined us as mermaids in the Mediterranean so an underwater like Atlantis with ruins was the only way to go, however I actually started with a photograph of the reef in Key Largo in the Atlantic. I used these two photos of the reef: From there I resized, scaled and warped to get the image to look like it was taken under the water instead of above the water. I then created a light source from the top using the Lasso tool to mark out where I wanted my light rays to fall. Next came finding "ruins" that I could use to create my Atlantis. I chose the archway from this shot taken at Armadale Castle in Scotland: And also this shot of the Glastonbury Abbey for the larger ruins: For both of these I needed to cut out the pieces that I wanted, change the colors to fit in with my overall ocean color scheme and scale them down to fit into the image. I then used this photograph taken in the Red Sea during a trip to Israel:

By placing this photo in a back layer I could bring it through and give the image a feeling of depth. I also warped it out and used it underneath the stone floor which I lowered the opacity on. Both the stone floor and the throne were stock images.

I added the text and symbols, placed Lita and I in position and added sparkles on and around us. The final step was a gradient layer in two colors chosen from my image, layered on top of the entire image and the opacity lowered just a bit so that Lita and I still came through as the main subject but the colors are slightly more muted to give the feeling of being under the sea.

This image involved numerous hours, lots of learning, a gazillion layers and tons of patience but I must say that I'm really proud of myself for following through with my artistic vision and bringing this piece alive. I'm also very excited to see where Lita takes her vision from this session and when she has it finished I will definately be posting a link to it from here. Next up for me is processing of some nature photos and then working on a few other artistic series including a "Mad Magician" series and a "Faerie" series!