Cabinet cards...photographic postcards...vintage photographs.
Over time, many of these images end up unwanted showing up in estate sales, antique stores and even on eBay. But, like our own photographs, these images once meant something to someone.
There are people like myself who collect old photographs. I find it interesting, these unknown faces staring at me. What kind of life did they live? What were their thoughts when that photograph was taken? What tragedies did they endure? What happiness graced them?
Vintage collages can give new life to an old, discarded photograph and turn it into something creative and artful.
Even if you don't collect old photographs, you can find several resources online where you can download free images for use in your artwork.
I currently have a few available for use here in my Vintage Stock Gallery:
http://lausanne.deviantart.com/
Whether you are using my stock or someone else's, always remember to follow the rules for use.
Now, let's see just how easy it is to create a vintage collage in Photoshop using layers!
First, choose a vintage photograph. Here is the one I used from my own collection to create my image "Exploration":
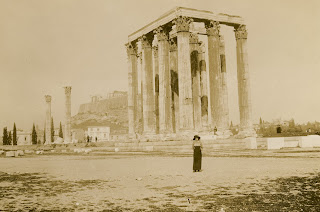
It's a fantastic find for a vintage photograph having a lone figure in front of this stunning monument. But, let's make it more interesting! One of the easiest ways to do that is to add a texture. You can find textures available anywhere..just look around..peeling paint? brick wall? pile of hay? You can begin to stockpile your own textures or visit a group like Textures for Layers on flickr and download some free textures but be sure to follow the rules of the original contributor regarding use of their texture and be sure to always give proper credit:
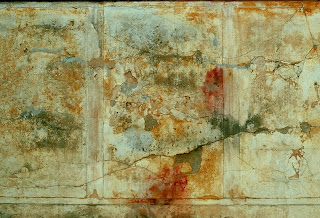
For "Exploration", I wanted a texture that had color since the original image is monotone. I chose one from flickr user bernhofen (who posted it in the Textures for Layers group) which is a photo of a corrupted Roman Fresco, perfect for this ancient monument:
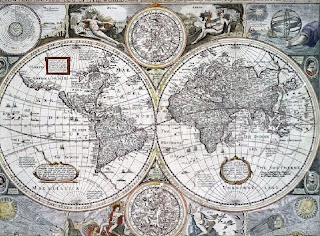
When making a collage, there is no limit to how many images you can layer into it. I've seen digital collages with dozens of images compiled into one masterful piece. However, for "Exploration", I didn't want to distract too much from the original photograph so besides the texture I decided on just one other additional item. I chose a map from my own personal stock in keeping with the theme of travel and exploration:
Now that you have all your images open in Photoshop, let's combine them using Layers.
The first step is to make a copy of your original background layer. You can do this by going to Layer-Duplicate Layer-Background Copy. This way your original image stays untouched in case you make a mistake or want to erase something you did.
Next, let's make a new layer above your Background Copy. Click on Layer-New Layer and name it "Texture". You can also create a new layer by clicking on the icon at the bottom of the layer pallet. Click on your texture image and go to Select-All followed by Edit-Copy.
You can now click on your new texture layer and select paste to add the texture. The texture will cover the entire image so you will need to adjust Opacity in order for your chosen photograph to show through. For "Exploration" I didn't want it too light because I wanted some of the color to show through so I chose to lower the opacity to 60%. You can now choose a blending mode...when doing collages or working with textures, I tend to use the following blending modes the most: Multiply, Soft Light and Overlay. For "Exploration" I chose Multiply which gives more punch to the colors in the texture.
With the Texture Layer highlighted in the layers pallet, click on the Layer Mask icon at the bottom. Using a soft brush you can erase any areas where you don't want the texture. In my image I erased around the top of the figure so she would stand out a bit more.
Continue to add images by repeating the same step above to create new layers, adjusting opacity & blending modes and softening up or removing any hard edges by using a layer mask with a soft brush.
For the map image, I used the rotate tool to angle the image before blending it in with Overlay set at 50%. By placing the map up in the top left corner, I balance out the composition. Any additional images added to this piece would throw that off. You still want to be mindful of composition when creating collages. Be creative but don't overpower your composition by placing too many images into one piece.
I hope you enjoyed this short tutorial and above all, remember to be creative and have fun!


2 comments:
Fantastic job with your illustrations and breaking it down comprehensively. I also frequently use multiply and soft light in blending modes, with occasional use of overlay. Thanks for taking the time to share.
Thank you Lita! I probably do use Multiply the most..I love the contrast and punch it gives.
Post a Comment